
Fitness Testing For Hockey Players
A recommended fitness test battery for hockey players.
With the upcoming season occurring after such a long layoff, it’s important for coaches and players to be cognizant of their fitness levels prior to ramping their workload up if they want to avoid injury and be in prime shape heading into try-outs. By being aware of your weaknesses, you can program specific exercises to create the best and strongest version of yourself.
The following table modified from Nightingale et al. (2013) provides an excellent battery of tests that addresses all of the major fitness components associated with hockey.
| Fitness Component | Fitness Test | Modality | Reference |
| Anthropometry | Height/weight/body fat % | Off-ice | (Geithner et al., 2006) |
| Anaerobic Power | Vertical Jump | Off-ice | (Jamie F. Burr et al., 2007) |
| Upper Body Strength | 1RM bench press | Off-ice | (Ransdell & Murray, 2011) |
| Lower Body Strength | 1RM front/back squat | Off-ice | (Ransdell & Murray, 2011) |
| Acceleration | 6.1m sprint | On-ice | (Bracko, 2001) |
| Speed | 35m sprint | On-ice | (Farlinger et al., 2007) |
| Change of Direction | Cornering S Test | On-ice | (Farlinger et al., 2007) |
| Aerobic Power | 30-15 IIT | On-ice | (Buchheit et al., 2011) |
Test 1: Anthropometry
Anthropometry simply means body measurements. These are important values to track over the course of the season because they are quick, require little equipment and expertise, and provide a pretty good holistic view into a player’s health. The most common measures are height, weight, BMI calculated from height and weight, and body fat percentage. Body fat percentage can be calculated a few ways including skinfold tests, bioelectrical impedance analysis, a BodPod, or DEXA scan. The latter two are rather extensive so if you’re trying to test a number of athletes, the first two are likely your best options.
Test 2: Anaerobic Power
A simple method for gathering insight into a player’s anaerobic power is through the vertical jump. Ways to measure jump height include a tape measure on the wall, Vertec, jump mats, or force plates. If time allows, consider taking the highest of 2-3 jumps because there is a priming effect in some athletes. If you want to standardize the test to just lower body power, have the player perform a countermovement jump with the hands on the hips. If you want to completely remove the stretch-shortening cycle (elastic capability of tendons and muscles), have players perform a squat jump with hands on the hips.
Test 3: Upper Body Strength
The bench press is a pretty well-known exercise and the maximum weight a player can complete one repetition (1RM) is a great measure of their upper body strength. This test should only be completed if your players have had some formal guidance into weight lifting regarding technique (e.g. five points of contact) from a trained professional. Remember to work up to this 1RM in that the you’re hitting the players max on about the third set. Finally, do not try this test without at least one Spotter. You are testing a player’s max capabilities so if they’re not close to failure (i.e. they need a Spotter), it’s not their true 1RM.
Test 4: Lower Body Strength
Similarly, the back/front squat exercises are another well-known test but once again, should be reserved for only those who are comfortable with the squatting technique. Back squats typically allow for a higher 1RM but be flexible with respect to the players’ comfort and preferences. Some players with back pain history will prefer the front squat, while others may find that the bar ‘chokes’ them during a front squat. Just be consistent with the chosen exercise so progress can be determined. Once again, use Spotters!
Test 5: Acceleration
This on-ice test simply has players start on any chosen line and skate 6.1m (20ft) as fast as they can. Depending on your rink size, this is about the length from red line to blue line. Coaches can use timing gates or hand timers to track performance and it’s also best to allow 2-3 trials per each player. Remember to shift starting positions every so often as the ice will get chewed up pretty quickly.
Test 6: Speed
Another simple test where the player skates straight for 35m using maximal effort. Once again, depending on your rink size, this is likely about the distance from the goal line to far blue line. Allow for 1-2 trials with adequate rest breaks as you don’t want them performing in a fatigued state.
Test 7: Cornering S Test
This test has players start behind the net, skate around one zone circle, around the second zone circle and then finishing at the blue line (see Figure 1). This is also timed by a coach, 1-2 trials and can also be conducted both ways to preserve ice quality.
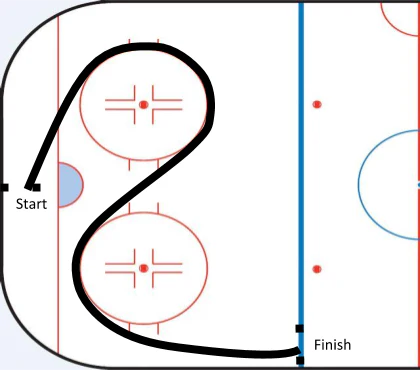
Figure 1. Diagram of the Cornering S Test adapted from (Farlinger et al., 2007)
Test 8: 30-15 Intermittent Ice Test
This test was adapted from the off-ice 30-15 Intermittent Test in that two lines are drawn 40m apart from each other on the ice. Players start on one line and skate to the other line while listening to the auditory signals (Figure 2). The first signal indicates players to start, the second auditory signal indicates they should be crossing the halfway (20m) line, and the third signal indicates they should be turning at the far line (40m from start). Players then make sure they cross the line with at least one foot, complete a fall stop (no wide turning) and continue back the other way in which they should hit the 4th auditory signal at the halfway mark, and so on. Players continue like so for 30s and then rest for 15s, in which they are encouraged to glide to the closest line to prepare for the next phase. The auditory signals are found best to start at a speed of 10.8 km/h and increase by 0.63 km/h. This will ensure the test challenges the aerobic system but will end in a reasonable amount of time (5-6 mins).

Figure 2. Ice set up for the 30-15s Intermittent Ice Test.
Additional Notes
When conducting fitness testing, there are a few items the coach must be aware of to maximize performance but also ensure a safe environment for their players. First, all players should be healthy and have medical clearance to participate. Second, a comprehensive warm-up and activation period should be provided to avoid muscle strains. Third, adequate rest and water breaks should be provided to avoid fatigue and dehydration. Fourth, a competitive atmosphere should exist that encourages players to perform their best. This could be pump-up music, cheering from coaches and teammates and feedback on performance so that they can challenge themselves and teammates. Fifth, the order of tests is important. Off-ice metrics should be taken first while the players are fresh and hydrated as this will affect body weight and fat percentage. The intermittent test should be done last on the ice because it’s exhaustive and would hinder performance in the acceleration and speed tests. Finally, fitness testing should be done semi-regularly during a season to ensure players are at their optimal performance or may require additional/altered strength and conditioning programming.
Best of luck and remember to compete to be the best version of yourself every day.